Thursday, December 17, 2015

Evolution of the truffle

At this time of year I often make truffles. Something luscious, vegan and packed full of kilojoules is the perfect way to celebrate the solstice.

Over the years the truffles have evolved from a coconut cream based chocolate ball, to an infused coconut oil one. 

The problem with truffles is they’re often frustrating and time consuming to make. The mix needs to be firm but not so cold it shatters, nor so warm it melts just looking at it. Let’s face it – late at night on the solstice eve, constantly walking between the workbench and fridge to rechill the mix between every half dozen truffles gets a tad tiresome. In humid December weather, sitting in a tepid bath with an icy drink (and smouldering companion) would be way more fun.

A couple of months ago I promised to take a sweet to a friends place for dinner. I dithered. I dathered. Until finally I only had a couple of hours to concoct something. The ‘something’ became a cubed version of truffles, simple cut into mouth-sized bites. 

If time permits you can still go down the sensory truffle path and infuse the oil with orange peel, spices or something else equally delicious (chilli anyone?). But the version I ended up creating with walnuts and liqueur worked fine. Lets put it this way; there were no complaints or leftovers.

Because how I conceptualised this recipe and what actually went into it are slightly different - I'm giving two different ingredients lists. I know some of you actually like qualities and others (like me) have a 'look and adapt' approach. Lets keep everyone happy!

The truffle that became a square

Freeform ingredients list

Base
2 parts good quality chocolate
1 part coconut oil (plain or infused)
Pinch of sea salt

Texture and flavour
A handful of walnuts, broken into smallish pieces - and/or nut paste
A generous handful of something fruity with an edge e.g. dried cherries, freeze dried raspberries or orange zest
OR a couple of tsp of a good quality liqueur such as Grand Marnier or Frangelico if you want to extend the nut thing use hazel instead of walnuts. (Note: too much grog might stop it from setting)

A quantified list of ingredients

200 gm 80% good quality chocolate
100 gm coconut oil
100 gm almond butter (make sure it's pure, check the ingredients especially if its a big brand)
3/4 cup walnuts, roughly chopped
1 tsp vanilla extract
3 tsp Grand Marnier


Method

If you’re going to infuse the coconut oil, start this a day or two before. Otherwise the chocolate slice takes a few minutes to put together, plus another hour to chill.

Assemble your ingredients and find an appropriate tin or container. Ideally use a square or rectangular baking tin (nothing with sloping sides or alas, you’ll just have to eat all the trimmings!)  Aim for a size appropriate to the mass of ingredients so that the chocolate concoction comes up to about 3-5 cm high (depending on how small our large you want your squares). Metal is ideal, you don’t need to grease, though you can line with baking paper if desired.

Blitz or chop the chocolate so they’re in even sized pieces. In a double boiler gently heat until half the chocolate is melted.

If your coconut oil is solid, melt over a low heat – it takes a very short time so don’t take your eye off it. I usually let it half melt then turn the heat off.

Combine the chocolate, nut paste (optional) and oil (hopefully they’re still semi solid rather than a liquid but it still works, though the nuts or fruit might drop to the bottom). Mix through the nuts, fruit and/or flavouring of choice.

Refrigerate for about an hour until fully solid (use the freezer if in a hurry). It's a good idea to allow it to come up to room temperature before cutting, to avoid snaps and shards. If necessary, run a warm knife around the edges and cut into bite-sized cubes. Of course if you painstakingly lined the tin, you just have to pull the slab out and cut.

You can pretty up the cubes of chocolatey goodness with a sprinkling of cocoa, icing sugar or rose petals but really, these taste so good they don’t need they don’t need it.


Labels: , , , , , , , ,

Monday, November 26, 2012

dessert gyoza


This post has been in the pipeline for the past year. Blame the delay on gluttony. This is a morsel best eaten hot, so the restraint required to delay gratification and take a photo is quite large.

For those pedants loving precise measurements, the joy of this recipe is that you can make a small batch of three or four (if you can restrain yourself) for some late night solo pleasure, or dozens for a large crowd. As only a teaspoon of filling per gyoza is needed, a little goes a very long way. You can whiz up a batch in a mini food processor (for this job a regular sized processor is way too large, unless you like A LOT of dessert) and store the leftovers in a jar in the fridge for later use.

While flour isn't exactly a health food, this recipe does incorporate wonderful antioxidant rich dark chocolate with the calcium (and other nutrient) abundance of figs and nuts. It's also vegan/dairy-free.

Chocolate gyoza

2 parts dark chocolate, at least 70% (For two people 40 grams of chocolate is enough)
1 part dried figs
1 part walnuts
Gyoza wrappers*
Coconut oil
Icing sugar (optional)


To the make the filling either finely chop the chocolate, fried figs and walnuts, or blitz in a mini food processor.


Take a gyoza wrapper; place a heaped teaspoon of filling mixture in the centre, run a little water around the outer few centimetres of the wrapper, fold and gently press together. You can crimp by hand or use one of those nifty cheap plastic gyoza presses from an Asian grocery store. Repeat until you have the desired number of gyoza.

Heat a frying pan on medium. Add a teaspoon of coconut oil (really this is the best oil for the job) and place as many gyoza as you can in the pan. It’s ok for them to snuggle up next to each other. Cook for about 3 minutes on the first side, flip over, then another 2 minutes on the other. Or til just golden.

Plate up. Dust with icing sugar if desired and eat while hot.


Variations

What do you like with your chocolate? I settled on figs and nuts to slightly mitigate the sweetness and bring a little more healthy goodness to the dessert.

But if you’re not a health freak you can spike pure chocolate with a little orange zest, a splash of liqueur, a smidgeon of sea salt or even black pepper.


* you can find gyoza wrappers in the fridge at most Asian grocery stores.

Labels: , , , , , , , , ,

Sunday, July 08, 2012

quick update from the trenches

There’s been some cooking

Accidental sorrel soup.
How to turn an average end-of-the-week-leftover-veggie soup into a stellar meal? Just add a handful of sorrel and blend. The base combo of alliums/cauliflower/zucchini/potato simmered in stock got the zing it needed when blended with the lemony green herb. A little goes a long way.

Oranges are not the only fruit.
But certainly the most abundant one in our house at the moment due to the arrival of two boxes of home-grown citrus. A batch of orange and spice vegan truffles were scoffed with alarming speed and with zest added to every conceivable dish, the fridge is full of lemons and oranges devested of their skin. As always, there’s large batch of preserved lemons on the go.

Quinoa for breakfast and dinner.
Cooked in orange and ginger juice. A superb breakfast that can be dolled up with a drizzle of maple syrup and some toasted almonds for a deceptively healthy dessert.

Speaking of dessert.
You know I’m not the queen of cooked desserts, right? But my oh my, I had a brilliant idea and minutes later dessert gyozas were on the table. I’d call them a work in progress but really they’re so simple they don’t need work. Three batches down I can’t stop long enough to photograph them before they’re gone. Will share soon, blogging mojo willing.

What’s rocking your kitchen?


Labels: , , , , , , , , , , , , , , , ,

Tuesday, January 31, 2012

raw fruit pie

The vegan summer* continues. As it’s been an unusual month, throwing my blogging mojo way off centre, excuse me starting in the middle rather than the beginning of the journey.

As a student for four years in my 20’s, most of what I cooked was vegan by default. All the shared houses were nominally vegetarian (what we ate outside of home varied somewhat). There was the odd egg but the sparse kitty could rarely stretch to seafood.

Recently I unearthed my hand written recipe collection from that time and revisited what I used to eat. Beans, lentils, curries, pies, risotto, tofu balls and soups appeared to be on high rotation. But desserts, bar the odd cake, didn’t get a look in.

One exception being a raw fruit pie introduced to me by a flatmate who’d grown up in the 70s with an older, hippy sister who went on a raw food diet (somewhere between rebirthing and following some guru or another). It’s more than 20 years since I made the “pie” and the recipe is a tad vague but strangely legible. I remember there being oats in the base, yet they’re only mentioned as an after thought and I don’t recall ever cooking with fresh coconut. The size of pie dish, consistency of filling and other details remain absent.

I tweaked the original recipe a bit but stayed true to the memory of the dish. It must have been good because we had seconds, barely leaving any for breakfast.

The original recipe is at the end of this post, for what it’s worth.


Raw fruit pie

Base

3/4 c rolled oats, ground

1/2 c raw pistachios, ground

1/2 c raw almonds, ground

(other nuts or seeds can be substituted)

1/2 c dates, pitted and chopped

(other dried fruit can be substituted)

3/4 c desiccated coconut

1 tsp cinnamon, ground

1/4 cup coconut milk

Water, if needed

1/4 c honey

Soak oats and dried fruit in coconut milk and a little water, for about half an hour until softened. Combine with remaining ingredients and blend in a food processor.

Grease a pie dish (I used a 25 cm flan dish) with coconut oil. Push the rather sticky base into the bottom of the pan. It seems too little but will make it to the outer reaches with gentle coaxing. Rest it in freezer for 15 minutes.

Filling

3 medium sized apples, grated

2 tabs lemon juice

3 bananas, mashed

1 tsp coconut cream (the solids in the canned coconut milk)

1/2 cup desiccated coconut

Blend ingredients in food processor and spoon onto the base. Refrigerate til ready to serve.

Before serving decorate with fresh fruit. I used slices of kiwi and banana but any fruit will do such as fresh berries or orange segments.


A quick outdoor shot at 7.30 pm, excuse the dullness of the photo


The original recipe (somewhere between rebirthing and guru worship)

Base

1/2 c dates

1/2 c sultanas

1 cup sunflower seeds

1/4 c almonds’

1/4c fresh coconut (its not clear if this was the juice or flesh)

1/4 c desiccated coconut

1 tsp cinnamon

1/4 cup honey

Soak fruit 1 hour. Grind nuts and seeds. Combine ingredients til smooth in food processor. Press into pie dish to form a crust. Put in freezer ~ 15 minutes.

*Oats ok with fruit and substitute to substitute (note the ingredients list has no asterisks to indicate what can be substituted)

Filling

2 grated apples

2 tab lemon juice

1/4 cup fresh coconut

2 mashed bananas

Blend


Stir in 2 sliced bananas and add to crust.

Decorate with 1 kiwi fruit, sliced and 1 – 2 mandarins

* The Significant Eater (SE) is currently vegan. This summer all home cooking has been animal product-free.

Labels: , , , , , , , ,

Saturday, November 12, 2011

scented vegan truffles: a sensory experience

Scent: orange, vanilla, coconut, chocolate.

Texture: silky, melt in your mouth.

Flavour: see scent…all that and more.

Sound: can you hear the groans of pleasure, followed by, “holly f*ck give me more”?

For those who thought vegan food was all mung beans and healthy goodness, I give you the most luscious morsel to have graced my senses in living memory.


Vegan truffle redux
(Quantities for an experimental batch of about 20 truffles)

300 gm organic coconut oil
The rind of one organic orange
1 –2 vanilla pods
600 gm good quality dark chocolate (I used an organic 70% block of couverture)

Add coconut oil to a small pot. In this part of the world, it’ll be solid rather than free flowing. Wash and dry your orange. I used a Valencia as it was the freshest around at this end of the citrus season. As you’re using the skin of a highly sprayed crop, it’s worth buying organic. Carefully peel or zest the orange, avoiding the pith. Split your vanilla pod(s) open. Add the peel and vanilla to the coconut oil and melt over a low heat. Once melted cover with a lid, turn off the heat and leave to infuse in a warm place for about 24 hours. You should have a heavenly scented oil that after some time solidifies again.

The next day, or whenever the mood takes you (you can store the infused oil in the fridge for a couple of weeks if need be), chop your chocolate finely then whiz in the food processor. After a few blitzes if should be the consistency of breadcrumbs. Now heat the oil til it melts, strain through a sieve and pour onto the chocolate in the food processor bowl. A couple more whizzes and you’ll have a divine smelling, melted chocolate mixture. Poor into a tub, cover and refrigerate for 2-3 hours, til solid.

Now comes the fun part. The melon-baller method is a lot less messy than rolling with your hands (read my previous effort if you’d prefer the rustic version). Set out some good quality cocoa powder in a bowl, grab the melon-baller and a couple of teaspoons and get ready to go. On a warm day you may need to do this in batches if the mixture starts sticking to the baller. Just pop the truffle mix back in the fridge for 15 minutes.


Scoop some truffle mix, dunk it in the cocoa and toss it around with a couple of teaspoons, til coated. Repeat…again and again and again…

Sight:


a real food photographer would dust them with more cocoa to cover the teaspoon marks and arrange them on a pretty plate…but hell, life is too short to play with chocolate on such a hot day

Cook's notes

While my previous vegan truffles were moreish, the infused coconut oil version took them to a whole new level.

Obviously you can have fun infusing the coconut oil with your favourite flavour combinations. I’d originally chosen cardamom instead of vanilla but they were old and had lost too much of their essential oils.

Go easy. These are so rich. Savour the flavour, aroma and texture. More than one or two in a sitting could leave you feeling a little queasy.

Labels: , , , , , , , , , , ,

Wednesday, March 04, 2009

speedy raspberry "ice cream"

From my last post you may have been misled that kitchen-wise there was a hive of activity here at chez-food nazi. To continue this misconception, I whizzed up a batch of I-can’t-believe-its-not-ice-cream for my sister when she stayed recently.

Fortunately there were three frozen banana’s waiting in the freezer. I grabbed a punnet of (expensive, organic) late season raspberries from the market and, after rinsing, through them in the blender with the frozen bananas.

Preparation time – less than a minute.


Sure it needs to go back into the freezer for another couple of hours but how simple is that? My guest was suitably impressed and has returned to New Zealand to continue the tradition.

Tip 1: Raspberry “ice cream”, sorbet and the like, tastes great served with a dash of Grand Marnier liqueur.

Tip 2: Always replace the bananas with some more peeled, ripe ones in a bag in the freezer.

Labels: , , , , , ,

Friday, September 26, 2008

the last of the blood oranges

I woke up dreaming about jelly. Well not the jello variety exactly, a fruit kanten. Years ago I’d made one at a cooking course run by Tony Chiodo. It was so simple and elegant that I earmarked it to be made again. That was years ago but the recipe was exactly where I thought it would be and all I really needed to procure was some agar agar.

Agar agar is a more humane option as a setting agent than gelatin. No horse’s hooves (or for that matter, slightly unpleasant odour) involved. Technically it is a sea vegetable and they go crazy for it in Japan. I found it with no problem at Tofu Trek at Vic market.


The next step was to decide just what kind of fruit offering I wished to make.

The original recipe creates the dearest little translucent jellies made of clear apple juice set with blueberries. But as this was a test run (no grand dinner party here, I just wanted to play with the medium) I settled on the last of the blood oranges and some strawberries. A simple decision really, as even for conventional fruit the blueberries were hovering around the $8 mark, while they were giving strawberries away for $1 a punnet.

To make a fruit kanten there is a basic recipe to make the jelly:

For every 1 cup of fruit juice, use I teaspoon of agar agar flakes, (heaped if you are to add alcohol – whoops that let the next cat out of the bag, didn’t it) plus a tiny pinch of salt.

Simple.

As to the quantities, the original typed recipe actually used 3 tablespoon of agar agar to 3 cups of juice. But I had faithfully changed altered that as after cooking it we were told it was a typo and should have been teaspoon measures. In class we had made it with tablespoons and it was very firm, verging on hard. Though very yummy.

I cruised the net for quantities and most seemed to use tablespoons, then on a forum I found someone complaining that it seemed too firm and different to the ‘custard like’ kanten she’d eaten at a restaurant.

My texture was definitely set but a soft jelly. If you wish to do something creative like make a batch in a rectangular pan and cut it into squares to accompany another dessert then I’d suggest a tablespoon of agar agar per cup of juice.

But the ratio I used was perfect for:

Blood orange and vodka good karma jelly shots

1 cup freshly squeezed blood orange juice
1 heaped tsp agar agar
1 small pinch of salt
40 mls good quality vodka

Squeeze and strain your orange juice then place in a small pan on the stove. Add the agar agar and a tiny pinch of sea salt, and stir over medium heat. Bring to a simmer and let it gently bubble for 5-7 minutes til the agar agar flakes have dissolved. Keep stirring and checking. They actually do take this long to dissolve fully. You can remove the orange scum with a spoon, filter after cooking or leave it au naturel.

Once dissolved take the pan off the heat. Let it sit for a minute or two to before adding the vodka. Stir it through the juice then pour into shot glasses. Leave standing at room temperature for a couple of hours til they set.

Though remember, “drink responsibly", as the ads say.

But back to dessert.

I used the same quantities of blood orange juice and agar agar, plus the little pinch of sea salt. If making a larger batch use 3 cups of juice to 3 heaped teaspoons of agar agar. Once cooked I added the smallest splash of Grand Marnier. This is entirely optional but remember adding too much booze will dominate the delicate nature of the fruit and can also affect the ability to set. I arranged a quartered strawberry in the bottom of each teacup and covered with the liquid. If you are making this to impress, strain the cooked juice through muslin cloth to get a clearer liquid. It looks fabulous in clear glass but was hesitant to pour hot liquid into my best wine glasses.

Other options to the flavouring include – a squeeze of lemon, citrus zest, a vanilla pod and any decent fruit juice, combined with the best quality, seasonal fruit.

The flavour was intense and slightly tart. If you prefer a sweet dessert add some sugar at the cooking stage. But the combo of blood orange juice and strawberries went together well, with just a hint of Grand Marnier.


In the dream I used the juice of home grown, sweet tomatoes in a savoury kanten. I can’t wait til summer!

Labels: , , , , , , , ,

Sunday, May 11, 2008

Creamy quinoa with banana, cinnamon and almonds

I’m in love!

Well, not just sneakingly with Bret from Flight of the Conchords but another foreign import.

Quinoa is a seedy/grain with when cooked is soft yet yields a subtle crunch. I have previously explored red and white quinoa in savoury recipes such as stuffed artichokes and a simple pilaf but thanks to a recent post from fellow quinoa-lover Heidi at 101 cookbooks I realised it was time to explore what this grain could offer with a little sweetness.

There is a delightful evolution that occurs through the sharing of recipes. Heidi’s starting point was a quinoa berry breakfast featured in Dr John La Puma's “Chef MD's Big Book of Culinary Medicine”, which she shared with us as her version of a warm and nutty cinnamon quinoa recipe. Being the opposite of blackberry season in this part of the world I changed the fruit, nuts, sweetener and milk to what was on hand. The method is the same, yet each combination creates another possibility of flavours.

The second star to this mighty breakfast (or healthy dessert) is a little cassia bark. I’ve always preferred the flavour of the bark found in my favourite Asian grocery store, over the dusty, milder quills of cinnamon from the supermarket. The tougher, gutsier cassia is easily grated with a microplane or grater, so sprinkling is over this cereal is dead easy. Cassia lifts this dish onto an even higher plane, not just in taste but also in health benefits. Latest research shows this versatile herb not only eases digestive upsets but is very promising in lowering blood glucose in diabetes as well as neutralising a few rogue triglycerides.


I see no need for 1% or low fat milk as the original recipe calls for. Basically you are diluting your white fluid of choice 50:50 with water, which inherently renders it lower in fat. Soy milk, if you are not allergic to it, is a pleasant way to get a dose of phyto-oestrogens (a preventer, rather than promoter of breast cancer as it has often been mis-reported), rice or oat milk would do but only resort to cows milk if you lack imagination or resources. While keeping to the original quantities there is one other variation, this made a hearty breakfast for 2 rather than 4 and kept us going all day! Every mouthful was met with mutual groans of joy. This is my new favourite cereal for breakfast, making it a great gluten-free and dairy-free way to start the days

Tip: Always wash your quinoa before using it. If you don’t the bitter residue left on the grain will make you wonder why people rave about this rather expensive addition to the pantry.

Creamy quinoa with bananas, cinnamon and almonds

1 cup soy, or other milk of your choice
1 cup water
1 cup quinoa (red or white, it doesn’t matter which but I made this with red quinoa because it looks so pretty) rinsed well
1/2 – 1 tsp cassia bark or cinnamon, try grating it yourself for freshness
a handful of almonds, cut into slivers with a sharp knife
1 banana
a drizzle of maple syrup

Combine the milk, water and quinoa in a medium saucepan. Bring to a boil over high heat. While doing this if you have a gas cook top, warm a heat diffuser mat on another burner. Once boiling stir well, cover and transfer the pan to the heat mat (if not just turn the heat down to low). Simmer for about 15 minutes or until most of the liquid is absorbed. Add slices of banana and a generous sprinkle of cassia/cinnamon, stir through the quinoa, turn the heat off and leave the pan covered for another 5 minutes. Meantime, toast the slivered almonds in a hot pan until they begin to turn brown. Shake frequently and remember to remove from the pan from the heat the moment the almonds are done to prevent burning.

Spoon the quinoa into the bowls, garnish with another slice of banana, toasted almonds and a drizzle of maple syrup.

Take a deep breath and dive in!


This week’s Weekend Herb Blogging is hosted by Laurie at Mediterranean Cooking in Alaska. Check out her site in a couple of days to see the full round up of herb and vegetable recipes from around the globe.

Labels: , , , , , , , ,

Saturday, December 08, 2007

ice-cream that even a fruitarian could eat

Is it really 2 months since I bought Jill Dupleix’s ”Lighten Up”? Barely a day has gone by without thinking about her “Mock Choc ice-cream" and with a few ripe bananas patiently waiting in the freezer I don’t know what I was waiting for. The recipe I refer to is a creamy, sugar-free, frozen concoction made from bananas, cocoa powder and dark chocolate. Instead I took the idea and ran with it, as I always do. With so much fresh fruit in the house the thought of making ‘ice-cream’ without a machine and using no dairy on a hot day was irresistible. I admit to being just a little sceptical as to just how creamy the result would be.

“I can’t believe it’s not ice-cream”
(Serves 4, unless you want to keep it all for yourself)

3 bananas – peeled, chopped and frozen overnight
1.5 large mangoes
1 ripe wipe peach (it was begging to be used, another 1 would have been even better)
a generous squeeze of fresh lime juice

Blend all ingredients in a food processor til smooth. Pour into a container and freeze for at least 3 hours. Remove from freezer 10-15 before serving.

Verdict: yum! Of course I could have used 2 or mangoes or all white peaches if I'd had more. The lime gave the flavours a slight lift. Dupleix does a raspberry version too. Obviously most soft fruits would go well.

Enhancements: a splash of Grand Marnier when serving gives the mango an extra kick.

Variations: any leftovers make a great base for a smoothie.


sure an ice-cream scoop would have made for finer food styling - but it's just lucky I scraped enough of the leftovers out to take a pic before I scoffed it!

Labels: , , , , , , ,

Tuesday, August 28, 2007

An oh my goodness rhubarb moment

I caught a glimpse of The Cook and the Chef a few weeks ago and picked up a great new (for me) way of cooking rhubarb. It didn’t have a chance of lasting long enough to become their rhubarb charlotte - oh no, this was dashed out of the pan and into the mouth with undue haste.

Heavenly fried rhubarb

butter
chopped cleaned rhubarb
ginger root
cinnamon
sugar
(Refer to the link for more precise measurements)

Melt a generous knob of butter in a fry pan over low heat. Toss in the chunks of rhubarb, some grated ginger and a sprinkling of cinnamon. Stir. Throw in a handful of sugar and stir some more. Adjust for sweetness when the rhubarb has softened.

The flavour is intense and delicious. For those who want to do more of the dairy thing, it goes well with a dollop of whipped cream/yoghurt/ice cream/custard. For those who don’t, it stands up well on its own.

Enjoy

Labels: , , , ,

Thursday, April 20, 2006

autumn harvest


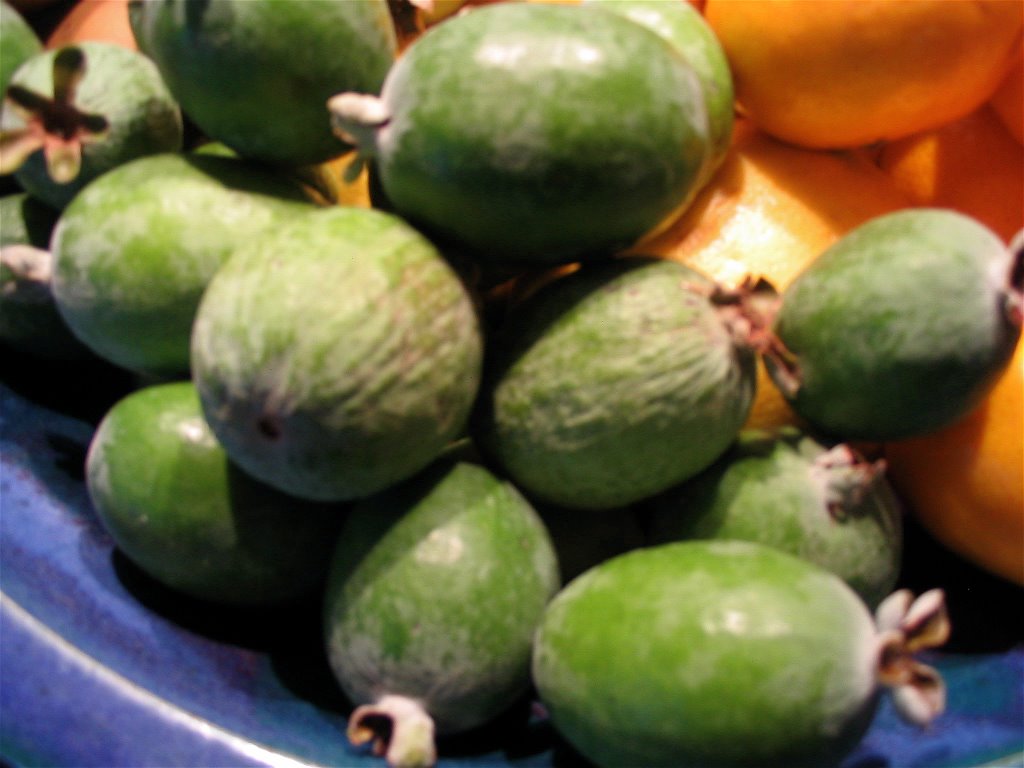
Despite the dull light of a rainy April afternoon, I had to take a picture of the fruit bowl groaning with goodness.

Although this is not the time of year for flashy tropicals or luscious berries, the humble apple is at it’s best and deserves its moment in the limelight. I got a mix of organic, red Croftons and Sweet Williams – both crisp and sweet. These little delights are best eaten as they are. I also like to grate some on soft, soaked oats for breakfast.

For the uninitiated, the green, egg shaped fruit are feijoas. You need smell-o-vision for this one, as they have a perfumed aroma. Inside there is white and almost gelatinous flesh, tasting both sharp and sweet at the same time. I love them but they are hard to get and only in season briefly in Melbourne. Perhaps, I shouldn’t talk them up too much as they are a steal at only $3 a kilo and a run on them could quadruple the price! The stall owner tells me it's mainly homesick Kiwis who buy them.


Mandarins have just come into season. These smelt great when I peeled them, but weren’t up to full flavour yet inside. Still though they have a sweetish tang and your hands smell wonderful afterwards.

The rest of the bowl comprises of grapefruits for juicing, limes, lemons and pears. Some late season grapes (green and red) sit on a platter demanding to be nibbled.

As bloggers it seems we spend so much time writing about food that is actually cooked. But spare a moment to contemplate the raw appeal of fresh fruit in season. Best enjoyed at room temperature and chewed slowly.

For those who need a recipe – here is one from my childhood.

Shirley’s Fruit Salad

Take a cross section of fresh fruit, trying to get a variety of colours and textures.
Peel if need be, slice or dice into varied shapes.
Cover with a liberal splash of Grand Marnier (or your favourite liqueur). Allow to macerate for an hour, but make sure fruit is well coated so it won’t turn brown – some fresh lime or orange juice can be added if you need more liquid.

Enjoy.

Labels: , , , , ,

Older Posts

Awarded by Kitchenetta
Obligatory copyright bit: (c)2004-2010 Another Outspoken Female. All rights reserved. No content on this website including, but not limited to, text and photography may be reproduced without prior explicit written consent from the copyright holder.

Powered by Blogger

Subscribe with Bloglines
Australian Food Bloggers Ring
list >> random >> join
Site Ring from Bravenet