Wednesday, October 14, 2026

Congee or Okaya - comfort food from Japan via China

As I wind down towards retirement, ahead of decommissioning my domain name, it's a pleasure to park years of additional recipes back on COAFN. This recipe was first published in August 2020. Wow remember the bad old days. I'm currently eating a bowel of okaya made with homemade veggie and prawn shell stock, topped with sesame oil and kimchi. This kind of deliciousness is too good not to share over here. Enjoy


How do you like your congee?


Having eaten this traditional dish for decades, I don’t know why it’s taken me so long to learn to cook savoury ‘rice porridge’ aka congee or okaya. In the midst of lockdown I discovered this bowl of comfort is incredibly easy to make.


Chinese or Japanese-style rice porridge


The rice

Sometimes the simplest recipes are the tastiest. With time on my hands I unnecessarily complicated things by falling into the black hole of Google trying to find the definitive congee recipe. But even searching the best rice to use lead to total confusion.

You’d think it’d make sense to use short grain white rice for a starchy, savoury porridge. However, according to hundreds of recipes online, you can use almost any kind. Long, short, Jasmine, Basmati, Japanese. You name it, someone will swear by it.

Having been on a Japanese rice bowl kick during lockdown (hands up who panic bought 2 kg of sushi rice), this seemed the obvious one to experiment with.


The method

So I began with okaya aka Japanese congee. Cooked in a ratio of 1 part rice to at least 5 parts liquid, traditionally it’s made with dashi (a stock made from bonito or kelp). I used a tetra pack of fish stock lurking at the back of the pantry for the first attempt and a couple of trusty Marigold vegetarian bouillon cubes second time round. Both were delicious.

All Japanese rice recipes begin with a ritual of soaking the rice for 30 minutes, followed by repeatedly draining and rinsing until the water becomes clear. I think this is to stop the rice sticking together but after cooking numerous batches of okaya, some soaked and rinsed and others not, I couldn’t discern much of a difference.

If making congee or okaya on a stove top, rather than ‘set and forget’ in a slow cooker or Instapot, choose your heaviest, large pot. Add your rinsed rice and stock. Okaya ratios range from 5 – 20 parts stock to rice. This may depend on the variety of ‘Japanese’ rice used and your preferred consistency (more about that later).

Bring the pot to a simmer, cover with a lid and turn down the heat to low. I like to add some thinly sliced root ginger while cooking. The first time you cook using a new brand of rice I suggest stirring every 10 to 15 minutes to begin with to make sure you have enough stock. My rice needed about 7 parts stock to make a loose risotto consistency and 10 to make a soupier version. However, longer grain rice usually needs less stock

Cook for about 90 minutes on low until you have your desired consistency. Stir every so often to make sure it doesn’t dry out, adding more stock as needed.


Consistency

Everything I’ve read about okaya, like congee, has a huge variation in consistency. Some people prefer a sloppy risotto consistency, while others insist it should be soupy.

The Chinese restaurant congee I order tends to be on the soupy side, while okaya is more solid. I suspect it’s like scrambled eggs, loose or dry depends on what your mum or dad made.

I actually like it both ways. The wet risotto style can make a satisfying one dish meal. For example, when subbing okaya for steamed rice and served with Japanese inspired toppings  Or loose and soupy with just a dash of soy sauce and/or toasted sesame oil, as a medicinal comfort food when feeling under the weather.


Toppings

If Lockdown 1.0 was a dish mine would be a bowl of steamed rice or okaya, topped with the following goodies: Japanese pickled daikon and ginger, bonito flakes soused in tamari or a little omelette with beaten eggs, mirin and tamari. Plus a sprinkle of furikake and toasted nori.

For a vegan Chinese-inspired congee I braised shitake mushrooms, spring onions, ginger and silken tofu in soy and the soaking water from the dried mushrooms.

In restaurants soupy congee is often served with some protein (such as poached chicken or fish), sesame oil and a few slices of the green tops of spring onions. A good way to repurpose leftovers or tempt a convalescent palate.


How do you like your savoury rice porridge?


UPDATE: While I don’t find it onerous to stir the pot a while, I know some congee/okaya lovers are short on time. Here’s is a short cut recipe for ‘20 minute congee‘. The trick involves some prepping ahead though, by freezing portions of precooked rice. No need to defrost before popping it into the stock. The recipe also includes ingredients and method for a tradition fish congee.


white enamel pot of white riced cooked in stock congee


Labels:

Friday, September 04, 2026

Mint symbol

Pol sambol is one of the traditional side dishes I devoured with gusto on a trip to Sri Lanka. This version combines coconut with fresh mint to add a flavour hit to a wrap, curry or just sprinkled on steamed rice. If you don’t have mint, other green herbs such as coriander, Vietnamese mint or even basil (alone or in combination), work equally as well. 

I like to make this sambol as a dry-ish mix that’s easy to sprinkle. But if you’re having trouble blending the ingredients or prefer a wet sambol gradually add a little water to make a paste or sauce.


Mint sambol

1 cup fresh mint leaves (or coriander, basil or a mix of green herbs)
1 small onion, or 2 small shallots
4 cloves garlic
2/3 cup shredded (or desiccated) coconut
1 green chili (optional)
Lime juice (juice of ½ – 1 limes)
Sea salt

Blend the above ingredients, except the lime juice and salt. Taste while gradually adding lime and salt. It just needs a little of each.


This recipe is vegan, vegetarian, dairy and gluten free. 

Labels: , , , , , , , ,

Sunday, June 28, 2026

Not your usual fish pie

 Each winter I get a strong craving for a piping hot, potato topped fish pie. When I started searching for a recipe it was hard to find one free of white sauce, so in the end I had to make up my own!

This one is gluten-free and can be made with a dairy-free mash if required. It has got me through the last half dozen winters so I can promise you it tastes delicious.

Gill’s Fish Pie

(serves at least 4 but this recipe halves well to make two individual pies)

2 tabs olive oil for sautéing
600g blue eye (or similar firm white fish) fillets, in approx. 8mm chunks
600g leeks, washed trimmed and sliced
2 cloves of garlic, finely chopped
Additional vegetables as desired, diced (e.g. zucchini)
75g green olives, pitted and roughly chopped
45 g of small capers (if using the ones in salt soak for 1 hour, then drain)
1 tablespoon lemon peel, finely chopped or grated
1/3 cup flat leaf parsley, chopped

For the mash

4 large or 6 medium sized potatoes 

salt

butter/olive oil

Mashed potato – enough to cover your pie dish (boil about 4 large or 6 medium sized potatoes til tender, drain well, mash with olive oil, dairy-free margarine or butter and a dash of salt) I use a mix of butter and olive oil and never add a milk substitute Prepare the mash in the usual way. I like to bake potatoes in their skin and scoop out the flesh, or simply steam if in a hurry. 

Cook cubes of fish in olive oil. Do this in batches so you don’t crowd the pan. Just 1 minute per side (to seal rather than cook through). Put aside. Now saute the leeks and then add the garlic, cook til soft. If you want to add more vegetables (zucchini, silverbeet etc) toss them in now too. Mix the fish and vegetables with lemon peel, capers, olives and parsley. A splash of white wine or brandy if you have it can be be good but not a deal breaker if you don't want to.Give it a quick toss then pour into a large ovenware dish, or individual pie dishes.

Don’t overfill the dishes or it might overflow. It’s a good idea to place dish(es) on a baking tray just in case.

Top with generous amounts of mash. Bake in a hot oven, around 200 C for about 20-30 minutes, til the mash is golden on top.

Labels: , ,

Wednesday, May 13, 2026

Roasted pumpkin and tomato soup


Recipe: Roasted pumpkin and tomato soup


This soup has been in high rotation this winter and each time I love it just a little more! It was inspired by Stephanie Alexander’s latest cookbook Home. I’ve simplified the method but roasting the vegetables is non-negotiable, as it’s what gives this soup its rich umami flavour.


Roasted pumpkin and tomato soup

1 kg pumpkin, peeled and cut into 6 cm chunks
1 small potato, peeled and halved (optional, to thicken the soup)
1 onion, peeled and thickly sliced
4 medium-large ripe tomatoes, halved
6 cloves of garlic, unpeeled
1.5 litres vegetable stock (I prefer homemade or Marigold bouillon powder)
1 – 2 tsp smoked paprika
1/3 cup olive oil
Sprig of rosemary (optional)
Sea salt and pepper to taste
Freshly ground pepper, to taste

Heat the oven to 220c (200c fan-forced).

Cut the pumpkin, potato and onion as directed above. Toss in a bowl with olive oil, herbs, garlic and a pinch of salt. When covered in oil, lay out in a single layer in your baking dish. Ideally use a large baking dish big enough to fit all the vegetables without overcrowding, that’s safe to use on the stove top, if it’s not big enough, use two.

Roast vegetables for 40 minutes, give the tray a shake and stir halfway through this time. It’s ok for the vegetable to get crisp and a little scorched (but not burnt) as this deepens the flavour.

Remove from the oven and throw away the rosemary stem. Take out the tomatoes and discard the skins. Do the same with the garlic. Both should be easy to slip off when cooked. Add these along with the rest of the vegetables to a large pot.

Place the baking dish, with the delicious stuck-on goodies, on the stove top on medium heat.  Add a cup or two of your stock and stir with a wooden spoon to deglaze the pan. Once the bits have come away from the pan, pour the deglazing liquid into your pot with the vegetable. Add the remaining stock and whizz with a hand blender until smooth. Alternatively you can use a blender or food processer.

Put the pot on the heat and bring to a simmer. Taste before adding salt and pepper. If using a commercial stock it mightn’t need much. If the soup is thicker than you’d like add more stock. If a bit thin, just simmer on a low heat til you have your desired consistency.


deep orange pumpkin and potatosoup bubbling in pot

Labels: , , , , ,

Friday, May 08, 2026

Lemony bliss balls

 Lemons (especially super juicy and fragrant Meyers) make an amazing guest star in this take on the traditional nut/fruit ball.  The recipe is super easy to make if you have a food processor and are the perfect healthy snack.


Lemony bliss balls

1 cup raw cashews (or your favourite type of nut)
10 – 12 Medjool dates, pitted (if dry, soak in warm water for an hour first and pat dry)
2 – 3 tablespoons lemon juice (about 1 lemon)
Zest of 1 lemon, unsprayed/organic
½ tsp vanilla extract (optional)
½ tsp sea salt
1/3 cup desiccated or shredded coconut to roll balls in

Pulse all ingredients except the coconut, in a food processor or blender until the nuts are well chopped. Check the mixture’s consistency, it needs to stick together to form a ball. If too crumbly try adding another date or two, or a bit more juice, water or a dash of coconut milk.

Add the desiccated coconut to a small dish. With clean damp hands, form into balls (I used a heaped teaspoon per ball) and roll in shredded coconut.

Store between layers of baking paper, in an airtight container and keep in the fridge. I’ve seen fruit and nut ball recipes that suggest they keep for up to 3 months but in my house they’ve never lasted this long!


Variations

No lemons – try orange juice (and zest if unsprayed)

No dates – try dried figs, may need to be soaked first

No coconut – use sesame or crushed hemp seeds


This first published my professional website, now archiving recipes on blogger

Labels: , , , , ,

Sunday, April 05, 2026

Okonomilyaki waffles

Originally published on my naturopathic website 


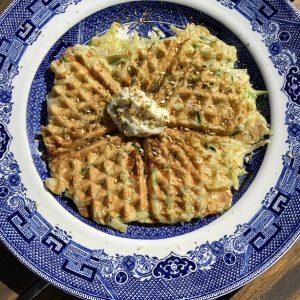
Waffles are currently having a hot minute on social media. Preferring savoury over sweet, hash browns were my gateway to this new craze. Craving a one-dish meal with more veggies, I wondered if the classic Japanese pancake (okonomiyaki) could be wafflised. Spoiler alert: they do!

The recipe below worked perfectly. Though an old stovetop waffle maker like mine necessitates flipping them over to cook both sides, it’s still quicker than making okonomiyaki the usual way.

This version is adapted from Hetty McKinnon, to make one egg, single serves. It’s a flexible recipe and a great way to turn wilted end-of-the week veggies into a quick and tasty lunch. In this case it was cabbage and grated zucchini that had seen better days but tasted as good as new in waffle form, with a dab of mayo and a sprinkle of my homemade furikaki.


Okonomiyaki waffles

Quantities per person/about 2 waffles

1/2 cup plain flour
90 ml (just over 1/3 cup) dashi or vegetable stock
1/4 tsp baking powder
Pinch of salt – depending on how salty the dashi/stock is (optional)
1.5 cups of finely shredded or grated vegetables, eg: cabbage, Brussels sprouts, sweet potato, potato, broccoli, zucchini, potato and/or cauliflower
1 spring onion finely chopped (if you have it)
1 egg, lightly beaten
Vegetable oil to grease the waffle iron.

To serve:
Mayonnaise
Furikake, toasted sesame or finely sliced spring onion greens

Slice or grate the vegetables finely. The waffles don’t cook for long, so the finer the better.

Mix together flour, stock (or dashi), baking powder and salt (if needed) in a large bowl, to form a batter. I usually add the egg at this stage, though Hetty suggests adding it with the vegetables.

Add the vegetable to the batter, mix well for at least 30 secs. Add the egg (if you haven’t already) and gently mix it in, until all the ingredients are combined without being over worked.

Heat your waffle iron and if it’s not non-stick, brush or spray on some vegetable oil. Once hot, add a tablespoon or two (depending on the size of your waffle maker) of the veggie batter and flatten a little with the back of the spoon. You want to get towards the edges without it overflowing when you put the top down.

Cooking time will vary on the type of iron. It’s worth checking after 2 minutes, to see if the waffle is brown. Once it's cooked, remove (or flip if it’s a stovetop iron).


To serve

Okonomiyaki are traditionally served with its own special sauce (found in some Asian grocery stores or DIY) and mayonnaise, topping the pancake in lines from a squeezy bottle. Often they are finished with bonito flakes, which wave or ‘dance’ on top with the heat of the pancake.

I’m not a fan of the sweet/tangy sauce, so I serve them with mayo and a sprinkle of furikake instead.


Variations

Hetty’s original Insta post includes kimchi – which sounds absolutely delicious!

The recipe can be veganised replacing eggs with ‘flax eggs’/ flax seeds or similar. Kewpie now make a vegan/egg-free mayo, or use your favourite plant-based brand. Be aware that som Japanese okonomiyaki sauces contain animal products.

Gluten-free – sub GF flour or try rice flour (don’t forget the baking powder).


Labels: , , , , , ,

Well hello, it's been a while

While winding down my 34 year naturopathic career, I'm left with that small business owner dilemma of just how long will I hang onto my business website. Those hosting fees add up over time.

Step 1 is adding recipes to this old blog. Seriously, it's my cooks journal and I don't want to be left going "how did I make okonomiyaki waffles?" I know a couple of old blog friends still follow my feed - so here's why it's active again.

Enjoy the drip feed and occasional deluge of recipes on this blog again.


PS: Yan, Wolli Creek Sydney - what are 'Chinese olives' and how can I make this amazing fried rice?


Wednesday, June 20, 2018

out of the closet

It's not as if it's a secret, but I thought it was time I came out.

No longer just another outspoken female, I'm Gill. A first wave blogger who got lost in the twitterverse and finally washed up at Instagram.

In recent years this blog has become collateral damage, that comes from too much time spent developing recipes, writing articles and hanging out on social media - under my own name.

I'm a naturopath who has been in the game for more than 26 years (gasp!). Most of my time has been spent in Melbourne, running my successful CBD clinic City Natural Therapies. I also hung out at 3RRR as the voice behind Health Trip for twenty years, with occasional appearances elsewhere on the grid talking about food on Eat It!

Since 2014 I've been a Sydney-sider hanging out in the Inner West, eating vegan pho, sushi and the rare pescatarian feast at Tetsuya!


I believe that healthy food should taste great and be a delight to eat.

If you're interested, I have a free, monthly newsletter with health tips, and often an original recipe or seasonal food updates. I continue working with people to eat well and feel better - online, anywhere in the world. As a naturopath, food and herbal medicine are my great loves. But like this blog, it's often the simplest remedies and lifestyle tweaks that can make the biggest difference to how you feel.

Though the odd travel-related post might creep back in here, all new recipes are on my naturopathy website. Check out the resources section for my recipe archive.


I love the friendly, inclusive world that blogging opened to me way back when. The delicious friendships made over so many meals remain a lasting legacy.


Labels: , , , , , , ,

Older Posts

Awarded by Kitchenetta
Obligatory copyright bit: (c)2004-2010 Another Outspoken Female. All rights reserved. No content on this website including, but not limited to, text and photography may be reproduced without prior explicit written consent from the copyright holder.

Powered by Blogger

Subscribe with Bloglines
Australian Food Bloggers Ring
list >> random >> join
Site Ring from Bravenet